UTV shocks are essential components for off-road adventures, providing stability and comfort by absorbing impacts and reducing bouncing. Fox UTV shocks have gained a reputation for their durability and performance. In this blog post, we will explore the process of rebuilding Fox UTV shocks, helping you enhance their performance and save money. Let’s dive into the world of Fox UTV shocks and learn how to rebuild them effectively.
How to Rebuild Fox UTV Shocks
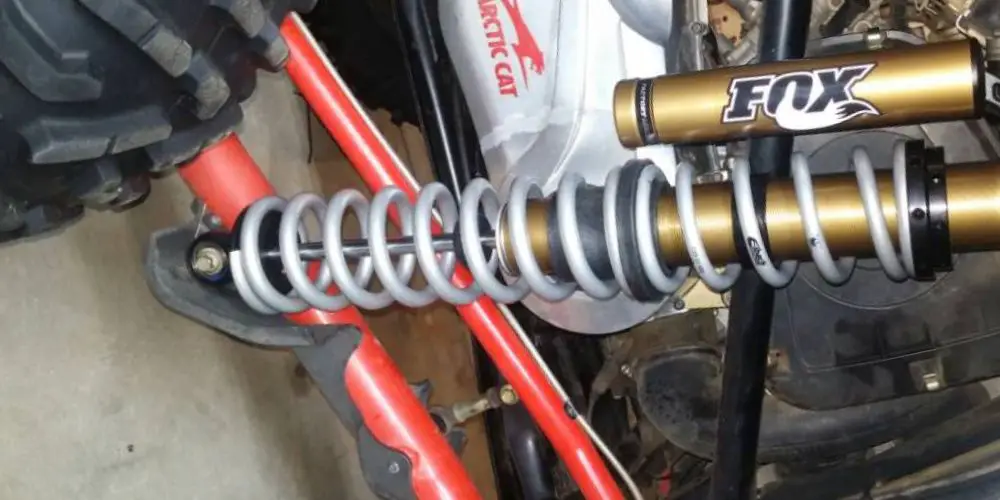
To maximize your UTV’s performance, it’s crucial to understand Fox UTV shocks. These shocks are renowned for their durability and performance. Let’s explore the key components of Fox UTV shocks, the types available, and the benefits of rebuilding them instead of replacing. By gaining this knowledge, you can make informed decisions to enhance your UTV’s performance.
Assessing the Need for Rebuilding
Before diving into the process of rebuilding Fox UTV shocks, it’s important to assess whether they require rebuilding in the first place. Here are some signs that indicate the need for rebuilding:
- Excessive Leakage: If you notice oil leaking from the shock body or the presence of oil stains on the shock, it’s a clear indication that the seals and o-rings may need replacement.
- Reduced Performance: If your UTV’s ride quality has deteriorated, with increased bouncing, bottoming out, or a lack of responsiveness, it’s likely that the shocks need attention.
- Visible Damage: Inspect the shocks for physical damage such as dents, bent shafts, or broken mounting brackets. These issues can affect the shock’s performance and safety.
To further evaluate the condition of your shocks, conduct a visual inspection and perform a bounce test:
- Visual Inspection: Check for signs of damage, corrosion, or excessive wear on the shock body, shaft, and other components. Look for loose or missing hardware as well.
- Bounce Test: With the UTV parked on a level surface, push down on each corner of the vehicle and observe how the shocks respond. They should compress and rebound smoothly without excessive bouncing or noise. Any uneven movement or lack of resistance indicates a potential problem.
Gathering Necessary Tools and Supplies
Once you have determined that rebuilding is necessary, it’s time to gather the tools and supplies needed for the task. Here’s a list of essential tools for rebuilding Fox UTV shocks:
- Wrenches and sockets: To remove and install the shocks, you’ll need a set of appropriate wrenches and sockets in various sizes.
- Shock spring compressor: If your shocks have coil springs, a spring compressor tool will be necessary to safely compress and remove the springs.
- Seal and bushing driver set: This set of drivers allows for the proper installation of seals and bushings during the rebuilding process.
When rebuilding Fox UTV shocks, using genuine Fox parts is crucial. Genuine parts ensure compatibility, reliability, and optimal performance. They are designed specifically for Fox shocks and provide the best fit and longevity.
Rebuild kits, containing essential components like seals, o-rings, bushings, and washers, are readily available for Fox UTV shocks. They can be purchased from authorized Fox dealers, online retailers, or directly from Fox’s website.
Step-by-Step Rebuilding Process
Now that you have the necessary tools and supplies, you can proceed with the step-by-step process of rebuilding Fox UTV shocks. Here’s an overview of the process:
- Preparing the UTV for shock removal: Safely lift the UTV and secure it on jack stands to access the shocks easily.
- Removing the shocks from the UTV: Depending on the UTV model, you may need to remove wheels, skid plates, or other components to access and remove the shocks.
- Disassembling the shocks and inspecting individual components: Carefully disassemble the shocks, documenting the order and orientation of each component. Inspect them for wear, damage, or signs of failure.
- Cleaning and lubricating the components: Thoroughly clean all components using a suitable solvent. Apply lubrication to moving parts as recommended by Fox.
- Replacing worn-out or damaged parts: Replace any worn-out or damaged components, such as seals, o-rings, or bushings, with genuine Fox parts from the rebuild kit.
- Reassembling the shocks and adjusting them to desired settings: Follow the manufacturer’s instructions to reassemble the shocks, ensuring proper alignment and torque specifications. Adjust the shocks’ settings, including compression and rebound, according to your riding preferences.
By following these steps, you can effectively rebuild your Fox UTV shocks, restoring their performance and extending their lifespan. In the next section, we will discuss the process of reinstalling the rebuilt shocks and conducting necessary testing.
Reinstalling and Testing the Rebuilt Shocks:
Once you have successfully rebuilt your Fox UTV shocks, it’s time to reinstall them onto your UTV and ensure they are performing optimally. Follow these steps to complete the process:
- Installing the rebuilt shocks back onto the UTV: Carefully position the shocks in their respective mounting locations. Use the appropriate hardware to secure them tightly, ensuring they are aligned properly.
- Checking for proper alignment and adjustment: Double-check that the shocks are aligned correctly and parallel to each other. Verify that all adjustments, such as compression and rebound settings, are set according to your desired preferences and riding conditions.
- Conducting a test ride to assess shock performance: Take your UTV for a test ride on various terrains and at different speeds. Pay attention to how the shocks handle bumps, jumps, and rough terrain. Assess the overall ride quality, stability, and responsiveness. Make adjustments as necessary to fine-tune the shocks to your specific preferences.
By testing the rebuilt shocks under real-world conditions, you can ensure they are performing optimally and delivering the desired ride experience.
Maintenance Tips and Best Practices
To maintain the longevity and performance of your Fox UTV shocks, consider the following tips and best practices:
- Regular maintenance: Perform routine inspections of your shocks to check for any signs of wear, leakage, or damage. Clean the shocks periodically and inspect the seals and bushings for proper function. Address any issues promptly to prevent further damage.
- Cleaning and protection: After off-road rides, clean your UTV shocks thoroughly to remove dirt, mud, and debris. Apply a protective coating or spray to prevent corrosion and maintain the shock’s performance.
- Adjustments for changing conditions: If you frequently ride in different terrains or encounter varying riding conditions, consider adjusting the shock settings accordingly. Fine-tuning compression and rebound settings can enhance your UTV’s performance in specific environments.
- Avoid overloading: Respect the manufacturer’s weight recommendations for your UTV. Overloading your vehicle can strain the shocks and affect their performance and longevity.
- Seek professional servicing for complex issues: If you encounter complex issues or problems beyond your expertise, it’s best to consult a professional service technician. They have the knowledge and specialized tools to diagnose and address intricate shock-related problems.
By adhering to these maintenance tips and best practices, you can maximize the lifespan and performance of your Fox UTV shocks, ensuring a smooth and controlled ride on your off-road adventures.
Final Thoughts
Maintaining well-functioning UTV shocks is essential for a smooth and controlled riding experience. Rebuilding Fox UTV shocks offers a cost-effective solution with customizable benefits. By being proactive in assessing, rebuilding, and maintaining shocks, you can optimize your UTV’s performance. Embrace the opportunity to enhance your off-road adventures and enjoy the thrill of a smooth ride.