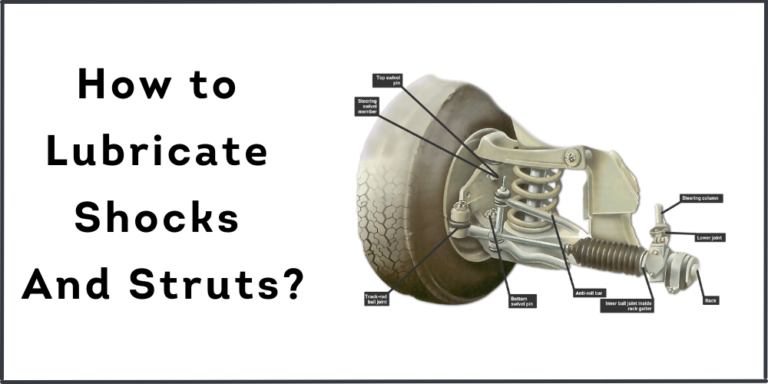
A front shock absorber provides damping to slow down the chevy truck vertical movement. A chevy truck shocks are usually located in-between the lower part of the suspension and just before axle. The job is to handle some of the forces caused by uneven terrain, allowing softer suspensions to do their job.
Also, it keeps your vehicle from bouncing too high while driving on pavements or roads with waves or ruts which can be hard for some people to use due to strength issues. It will also help lessen vibration movements that are transferred throughout a vehicle which may cause discomfort for drivers, passengers, cargo contents on long journeys.
Installing front shocks on a Chevy truck involves a straightforward process, but it’s important to follow the manufacturer’s instructions and ensure proper safety measures. Here’s a general guide on how to install front shocks on a Chevy truck:
Note: This is a general guide. Specific steps and details can vary based on the model and year of your Chevy truck. Consult your vehicle’s manual and the instructions provided with the shock absorbers for accurate information. If you’re not comfortable with vehicle maintenance, it’s recommended to seek professional help.
Tools and Materials You’ll Need:
- Jack and jack stands
- Lug wrench
- Socket and ratchet set
- Wrench set
- Pry bar
- New shock absorbers
- Torque wrench
How to Install Front Shocks on a Chevy Truck? – Quick Guide
Follow these simples steps and within few minutes you are able to install front shocks on a Chevy truck without any other person help. The same method you can apply on all Chevy trucks from 1994, 2000, 2003, 2004, and 2007.
1. Use truck jack to block your truck so it does not move and you can easily do the whole process.
2. Locate the front shocks on your truck, The front shocks on a Chevy truck are located below the axles.
3. Remove the bolts and springs from the old shocks, and replace with new ones
4. Replace all of the bolts and springs before reassembling
5. Install new shock absorbers to avoid future problems
6. Test out your newly installed shocks by driving over large bumps in order to make sure they’re working correctly
7. Reinstall protective covers for rear-view mirrors if removed during installation process
Safety Tips To Help You Out
- Check the clearance between the shock and tire
- Ensure that you have enough room to get a socket on the nut
- Use a jack to lift up the truck until it’s high enough for you to reach under and install shocks
- Place your hand inside of an old sock or glove before installing shocks, this will protect your hands from getting all oily and dirty
- Remove any other items in order to make more space while working underneath the vehicle
- Install new front shocks by attaching them with bolts and nuts, tightening them down with a wrench
Can You Install Shocks Yourself?
Installation of the passenger side shocks of a Chevrolet from this era is not exceedingly difficult if you have experience with automotive mechanics. While it might be a good idea to consult a professional for this particular task, it can be done by an experienced person using common knowledge and simple hand tools.
How to Replace Front Strut 2007-14 Chevy Silverado
Replacing the front struts on a 2007-2014 Chevy Silverado involves several steps and requires the appropriate tools and safety precautions. Here’s a general guide on how to replace the front struts:
Note: This is a general overview and may not cover every specific detail of your vehicle. Consult your vehicle’s service manual for precise instructions and specifications.
Tools and Materials Needed:
- Jack and jack stands
- Lug wrench
- Wrenches and sockets
- Torque wrench
- Ball joint separator
- Spring compressor
- Strut assembly
- Replacement struts
- Safety goggles and gloves
Step-by-Step Guide:
- Safety Precautions:
- Park your Silverado on a level surface and engage the parking brake.
- Wear safety goggles and gloves to protect yourself during the process.
- Front Wheel Removal:
- Use a lug wrench to slightly loosen the lug nuts on the front wheels.
- Lift the front of the vehicle using a jack and secure it with jack stands.
- Fully remove the lug nuts and wheels.
- Disconnect the Brake Line:
- Locate the brake line attached to the strut.
- Use a wrench to carefully disconnect the brake line from the strut, allowing it to hang without putting strain on the line.
- Remove the Stabilizer Link:
- Use a wrench to remove the nut securing the stabilizer link to the strut.
- Use a ball joint separator to detach the link from the strut.
- Support the Control Arm:
- Place a jack under the control arm to support it.
- Remove the Strut Bolts:
- Locate the two bolts securing the strut assembly to the steering knuckle.
- Use wrenches or sockets to remove these bolts.
- Compress the Coil Spring:
- Use a spring compressor to compress the coil spring on the strut assembly.
- Be extremely cautious when compressing the spring, as it stores a significant amount of energy.
- Remove the Upper Mount Bolts:
- Locate the upper mount bolts on the strut tower.
- Use wrenches or sockets to remove these bolts.
- Remove the Strut Assembly:
- Carefully slide the strut assembly out from the wheel well.
- Install the Replacement Strut:
- Insert the new strut assembly into the wheel well.
- Align the upper mount holes with the strut tower holes.
- Attach Upper Mount Bolts:
- Insert and tighten the upper mount bolts using the appropriate torque specifications.
- Release Spring Compression:
- Slowly and carefully release the coil spring compression using the spring compressor.
- Attach Strut Bolts:
- Attach the strut assembly to the steering knuckle by inserting and tightening the strut bolts to the proper torque.
- Reattach Stabilizer Link:
- Reattach the stabilizer link to the strut and secure it with the nut.
- Reconnect Brake Line:
- Reconnect the brake line to the strut and tighten the connection securely.
- Wheel Installation:
- Remount the front wheels onto the lug studs.
- Tighten the lug nuts in a crisscross pattern.
- Lower the Vehicle:
- Carefully lower the Silverado back to the ground using the jack.
- Remove the jack stands.
- Torque Lug Nuts:
- Use a torque wrench to tighten the lug nuts to the manufacturer’s specifications.
- Test Drive:
- Take a short test drive to ensure that the new struts are performing correctly.
Remember that this is a general guide, and your specific vehicle may have unique procedures and specifications. If you’re not confident in your mechanical skills, it’s recommended to have a professional mechanic perform the strut replacement to ensure safety and proper installation. Additionally, always consult your vehicle’s service manual for detailed instructions and torque specifications.
Conclusion:
Installing a front shock absorber on your Chevy truck isn’t as hard as it sounds. With this guide, you will have the tools to determine if you need new shocks and how to install them with ease. If any of these steps sound intimidating or confusing, we’re always here for support.
Related Guide:
Video Guide: